Bandsaw Blade Failure Guide: 20 Wear, Tooth and Breakage Patterns
Updated: 25 September 2026
A bandsaw blade that chips teeth, cracks, wears unevenly or fails earlier than expected is often showing you evidence of the underlying problem. The damage pattern can help narrow the cause to the blade selection, tooth pitch, break-in procedure, feed and speed settings, coolant, workholding, chip removal or the condition and adjustment of the saw itself.
This guide covers 20 common blade wear and failure patterns seen in metal-cutting bandsaw applications. Use the illustrations and descriptions as a starting point, then confirm settings and adjustments against the blade and machine manufacturer's recommendations.
Quick answer: what usually causes bandsaw blade failure?
The most common contributors are an incorrect blade or tooth pitch, poor blade break-in, incorrect feed or band speed, inadequate cutting fluid, poor workholding, a worn or incorrectly positioned chip brush, incorrect blade tension, worn guides or poor blade tracking. The pattern of the damage helps identify which of these to investigate first.
Safety first when inspecting a failed blade
Stop and isolate the bandsaw before inspecting, cleaning, adjusting or replacing the blade. Bandsaw blades have sharp teeth and a tensioned blade can store significant energy. Follow the machine manufacturer's blade-changing instructions and your workplace procedures, and use the required personal protective equipment when handling blades.
Start with these eight checks
1. Blade selection
Is the blade type suitable for the material and application?
2. Tooth pitch
Is the TPI appropriate for the section being cut?
3. Break-in
Was the new blade correctly broken in before full production cutting?
4. Feed and speed
Are both appropriate for the material and blade?
5. Cutting fluid
Is the correct fluid reaching the cut at the correct concentration and flow?
6. Workholding
Can the workpiece move, spin or vibrate during the cut?
7. Guides and brush
Are the guides and chip brush clean, serviceable and correctly positioned?
8. Tension and tracking
Does the blade run correctly without excessive contact with guides or wheel flanges?
Not familiar with terms such as gullet, tooth pitch, set or blade back? See our bandsaw blade anatomy guide before working through the patterns below.
Tooth wear, chipping and chip-control problems
Start here when the main evidence is visible around the tooth tips, tooth faces or gullets.
1. Heavy even wear on tooth tips and corners
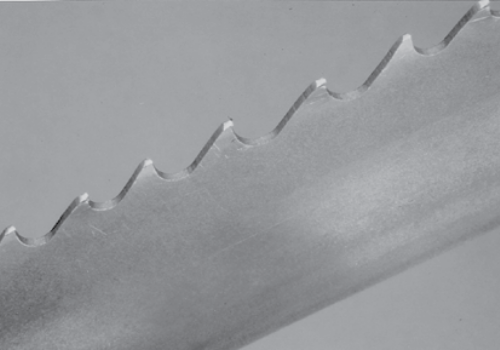
What it looks like: Tooth tips wear smoothly and the corners of set teeth become rounded rather than breaking away.
Likely causes:
- Incorrect or insufficient blade break-in.
- Band speed too high for the material.
- Feed too light, allowing the teeth to rub rather than cut.
- Hard, scaled or abrasive material.
- Insufficient or incorrectly applied cutting fluid.
Check first: Confirm the recommended feed and band speed, make sure the blade is producing a chip rather than rubbing, and check coolant delivery.
2. Wear on both sides of the teeth
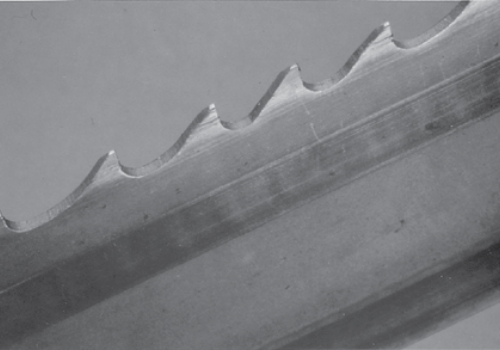
What it looks like: Heavy wear marks appear on both sides of the tooth set.
Likely causes:
- Broken, worn or incorrectly adjusted back-up or side guides.
- Guide arrangement unsuitable for the blade width.
- Backing the blade out of an incomplete cut.
Check first: Inspect guide condition and alignment, then look for evidence that the tooth set is contacting the guides or cut surface.
3. Wear on one side of the teeth
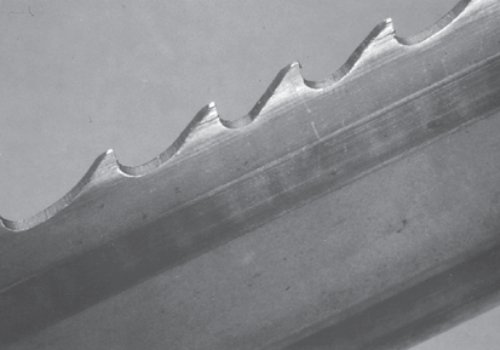
What it looks like: Only one side of the tooth set shows heavy wear.
Likely causes:
- Incorrect blade tracking or a worn wheel flange.
- Loose, worn or incorrectly positioned side guides.
- Blade not square to the workpiece.
- Blade rubbing against the cut on the return stroke.
- Teeth contacting the chip-brush assembly, guard or another machine component.
Check first: Look for one-sided contact marks around the guides and wheels, then verify blade alignment and tracking.
4. Chipped or broken teeth
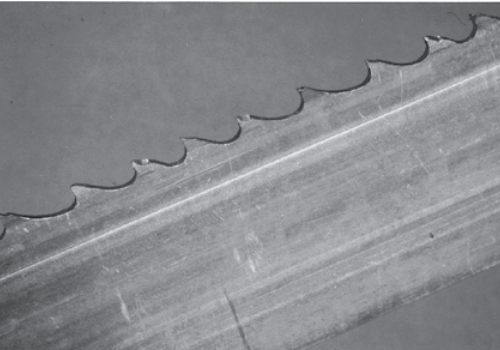
What it looks like: Scattered tooth tips or corners have chipped or broken away.
Likely causes:
- Incorrect break-in of a new blade.
- Incorrect blade type or tooth pitch.
- Damage while unfolding or handling the blade.
- Poor clamping, spinning or movement of the material.
- Excessive feed rate or feed pressure.
- Band speed too low for the application.
- Hard spots, inclusions or heavy scale in the material.
- A tooth becoming jammed in the cut.
Check first: Confirm the work is firmly clamped, verify tooth pitch against the section being cut, then review break-in, feed and speed.
5. Cracks or breakage starting at the blade back
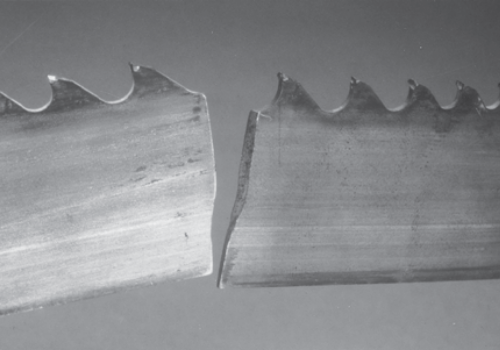
What it looks like: A crack or fracture starts at the back edge rather than at the tooth gullet.
Likely causes:
- Excessive back-up guide preload.
- Incorrect blade tension.
- Excessive feed.
- Blade tracking against the wheel flange.
- Worn or damaged back-up guides.
- Nicks or handling damage on the blade back.
Check first: Inspect the blade back for polishing, grooves or flange contact and verify guide condition, tracking and blade tension.
6. Tooth stripping
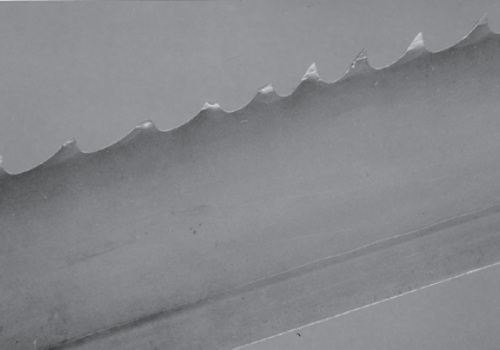
What it looks like: A section of teeth has been torn away from the blade backing.
Likely causes:
- Incorrect or skipped break-in procedure.
- Wrong tooth pitch for the material cross-section.
- Excessive feed pressure.
- Band speed too low for the material.
- Workpiece movement or vibration.
- Worn, missing or badly positioned chip brush.
- Insufficient cutting fluid.
- Hard spots or inclusions in the workpiece.
Check first: Stop before installing another blade into the same damaged cut. Tooth fragments can remain in the kerf and damage the replacement blade. Inspect the work and correct the underlying cause first.
7. Chips welded to the tooth tips
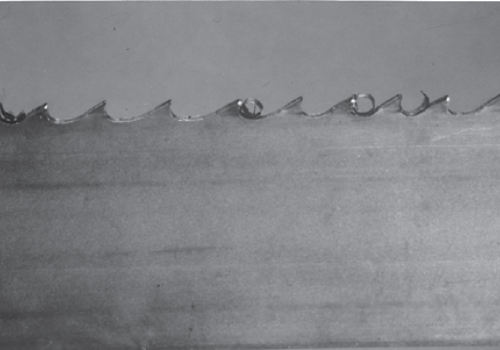
What it looks like: Heat and pressure cause chips to adhere to the tooth face or tip, creating a built-up edge.
Likely causes:
- Insufficient or poorly directed cutting fluid.
- Worn, missing or incorrectly adjusted chip brush.
- Incorrect band speed.
- Incorrect feed rate.
Check first: Make sure chips are being cleared from the gullets and confirm coolant flow reaches the cutting zone.
8. Gullets loading with material
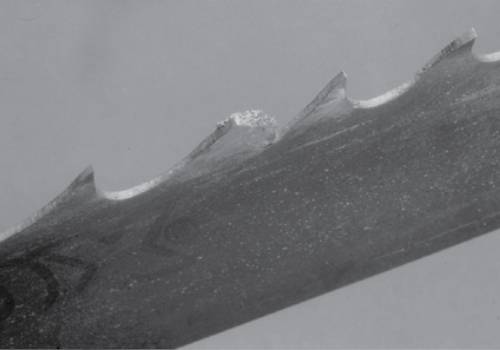
What it looks like: Chips pack into the gullets instead of being cleared from the blade.
Likely causes:
- Tooth pitch too fine, leaving insufficient gullet capacity.
- Feed rate producing chips larger than the gullet can carry.
- Worn, missing or incorrectly positioned chip brush.
- Insufficient cutting fluid.
Check first: Compare the blade TPI with the actual cross-section being cut, particularly on larger solids and bundles.
9. Discoloured tooth tips from excessive heat
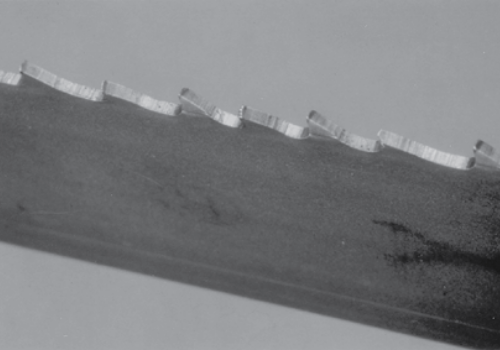
What it looks like: Tooth tips show visible heat discolouration caused by excessive friction or cutting temperature.
Likely causes:
- Insufficient cutting fluid.
- Band speed too high.
- Incorrect feed causing excessive rubbing or loading.
- Blade installed in the wrong cutting direction.
Check first: Verify blade direction, coolant delivery and the manufacturer's feed and speed recommendations.
Blade body, guide and fracture problems
These patterns usually point more strongly toward guides, tracking, tension, machine alignment or excessive loading.
10. Heavy wear on both sides of the blade
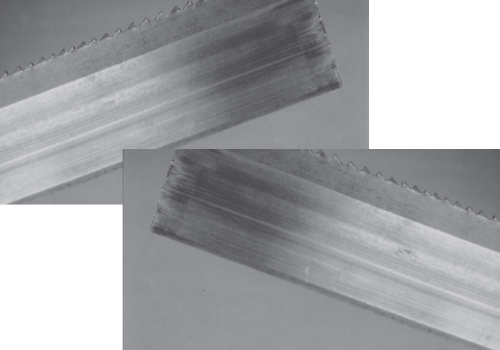
Likely causes: Damaged side guides, guides adjusted too tightly, inadequate fluid flow through the guide area or insufficient cutting fluid.
Check first: Inspect both guide faces for chips, grooves or excessive contact and confirm the blade can travel without being pinched.
11. Uneven wear or scoring on the sides of the blade
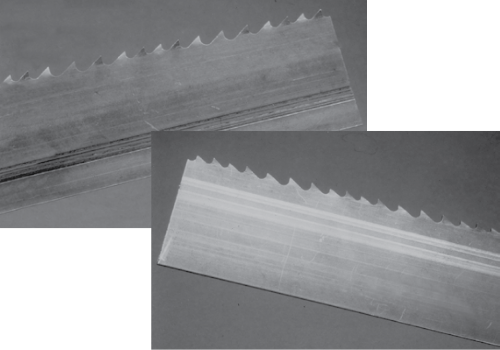
Likely causes: Loose, worn or damaged side guides, blade contact with another part of the machine, guide arms positioned too far apart or chips trapped in the guide assembly.
Check first: Clean and inspect the guide area before making adjustments, then move the guide arms as close to the work as the machine manufacturer recommends.
12. Heavy wear or deformation on the back edge
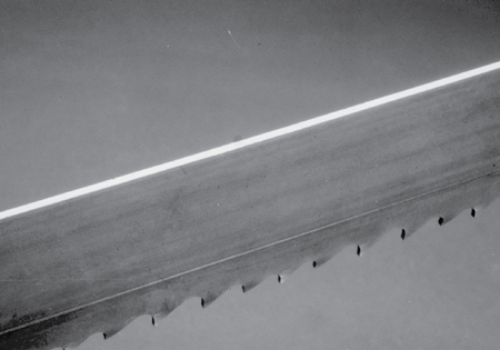
What it looks like: The back edge may appear polished, grooved or mechanically deformed.
Likely causes:
- Excessive feed.
- Excessive back-up guide preload.
- Incorrect blade tracking against the wheel flange.
- Worn or damaged back-up guides.
Check first: Inspect for continuous contact marks along the blade back and determine where that contact is occurring.
13. Butt-weld breakage
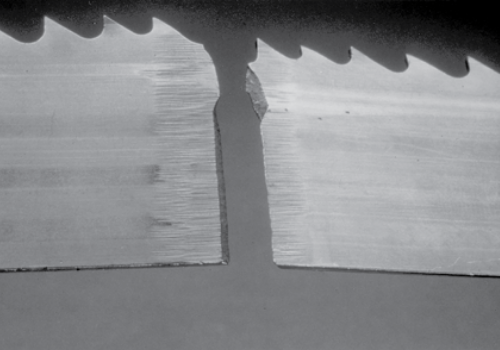
What it looks like: The blade fractures at or close to the welded joint. Weld finishing marks can help identify whether the fracture coincides with the weld.
Likely causes: Many of the same conditions that cause blade-body cracking can also produce a break at the weld, including guide problems, incorrect tension, tracking issues and excessive twisting or loading.
Check first: Do not automatically assume a weld defect. Inspect the saw and operating conditions first. If the break consistently occurs at the weld after machine causes have been ruled out, speak with the blade supplier.
14. Heavy wear in only the smallest gullets
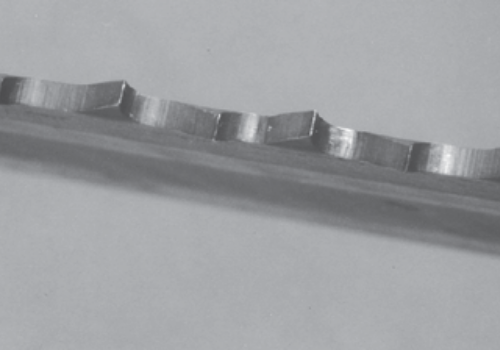
What it looks like: Wear is concentrated in the smaller gullets, indicating insufficient chip-carrying capacity at those points.
Likely causes:
- Excessive feed.
- Band speed too low.
- Tooth pitch too fine for the material cross-section.
Check first: Reassess the tooth pitch against the actual section in the cut and check whether chip volume is exceeding gullet capacity.
15. Blade-body fracture travelling at an angle
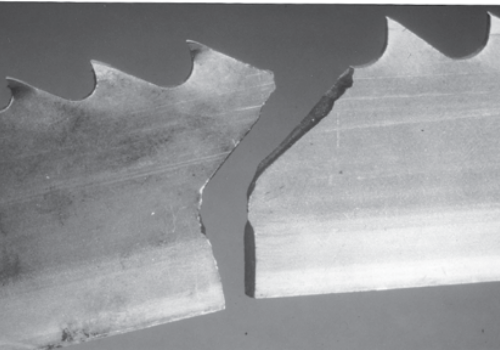
What it looks like: The fracture originates near a gullet and immediately travels diagonally through the blade body.
Likely causes:
- Excessive twisting stress on the blade.
- Guide arms positioned too far apart.
- Guide arms left wide while cutting a small section.
- Excessive back-up guide preload.
Check first: Look at the blade's path from the wheels through the guides and minimise unsupported blade span where the machine design allows.
16. Blade-body cracks starting at the gullets
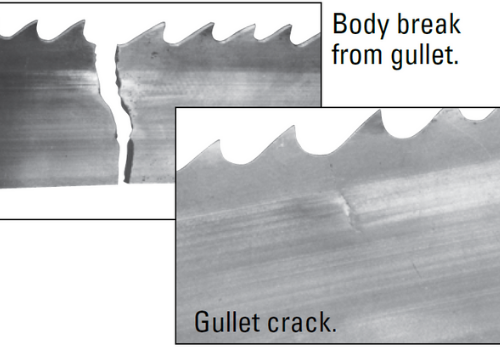
Likely causes:
- Excessive back-up guide preload.
- Incorrect blade tension.
- Guide arms positioned too far apart.
- Machine or guide alignment problems.
- Side guides adjusted too tightly.
- Continuing to run excessively worn teeth.
Check first: Check blade tension and guide adjustment against the machine manual, then inspect whether worn teeth or excessive feed have increased stress on the blade body.
Blade shape, tracking and twisting problems
17. Blade twisted into a figure-eight shape
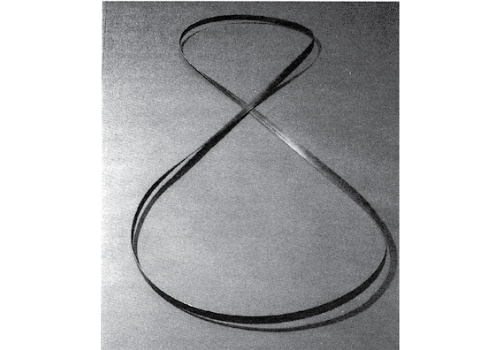
What it looks like: The blade no longer holds its normal loop shape, indicating that its flatness has been permanently altered.
Likely causes:
- Excessive blade tension.
- Conditions that make the tooth edge run progressively long or short.
- On contour applications, attempting a radius too tight for the blade width.
Check first: Do not simply fit another blade. Verify tension, guides, wheel condition and tracking before restarting.
18. Used blade is "long" on the tooth edge
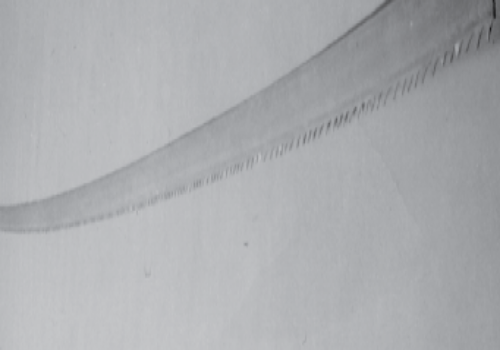
What it means: When the blade is laid on a flat surface, the tooth edge sits on the outside of the arc.
Likely causes:
- Side guides too tight near the gullets.
- Excessive back-up guide preload.
- Worn band wheels creating uneven stress.
- Excessive feed.
- Guide arms positioned too far apart.
- Blade tracking heavily against a wheel flange.
Check first: Inspect guide contact patterns, wheel condition and tracking before adjusting operating parameters.
19. Used blade is "short" on the tooth edge
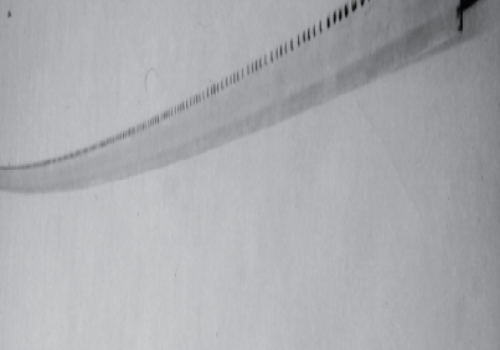
What it means: When laid on a flat surface, the tooth edge sits on the inside of the arc.
Likely causes:
- Side guides too tight near the blade back.
- Worn band wheels.
- Guide arms positioned too far apart.
- Excessive feed.
Check first: Inspect where the blade is contacting the guide system and confirm guide-arm spacing and wheel condition.
20. Broken blade shows a twist along its length
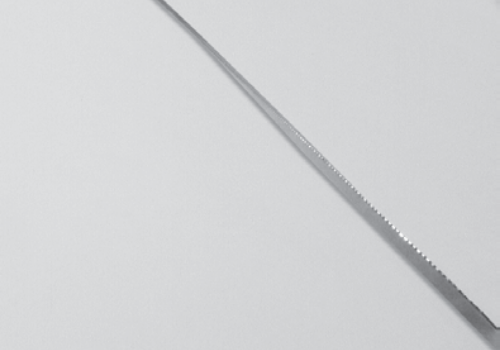
What it looks like: When the failed blade is laid on a flat surface, it retains a twist from one end to the other.
Likely causes:
- Excessive blade tension.
- Conditions causing the blade to become long or short on the tooth edge.
- On contour applications, cutting a radius tighter than the blade can accommodate.
Check first: Investigate tension, guide alignment, wheels and tracking before replacing the blade.
How to reduce repeat bandsaw blade failures
Replacing the blade without correcting the cause often means the next blade fails in the same way. When a blade shows premature damage, work through the system rather than changing several settings at once.
- Record the failure pattern. Photograph the blade, fracture, tooth damage and cut finish before discarding it.
- Confirm the blade. Check blade type, dimensions and tooth pitch against the material, shape and section being cut.
- Check the machine. Inspect guides, wheels, tracking, blade tension and chip brush condition.
- Check the workpiece. Make sure material cannot spin, move or vibrate during the cut.
- Check cutting conditions. Review band speed, feed, coolant type, concentration, flow and application.
- Correct one variable at a time where practical. This makes it easier to identify what actually caused the problem and reduces repeat failures.
If premature failures keep occurring, record the machine model, blade specification, material grade and size, feed and speed settings, coolant details, approximate blade life and photographs of the failed blade. That information gives AusTech's team a much better starting point for troubleshooting.
Need help solving a recurring bandsaw blade problem?
AusTech can help with blade selection, tooth pitch and practical troubleshooting for your application. Tell us what you're cutting, your blade specification and what the failed blade looks like, and we'll help you narrow down the likely cause.