Need to create a seamless joint?
It’s time to master the finger joint router bit. Not only can finger joints extend the length and width of timber they also create a seamless joint that is incredibly strong. This strength comes from the high surface area contact of each component which creates a strong glue joint. You can also use finger joint router bits to create a decorative feature when joining two tones of timber together.
If you’re using a finger joint bit for the first time we have compiled a handy guide below to ensure you get the perfect finish.
This article is authored by Carbitool, a leading woodworking tool manufacturer in Australia. In this guide, Carbitool shows us how to use the TAFJ 90 B ½ and 60 ½ Finger Joint Router Bits properly for your woodworks.
Step By Step Guide To Using The TAFJ 90 B ½ Finger Joint Router Bits
Important: This router bit is not for use in handheld routers. We advise that this bit be used in bench mounted/router tables or overhead routers only. TAFJ 90 B ½ should only be used in a routing machine with a variable speed adjustment. Due to the large diameter of this bit it should not be operated at a spindle speed of more than 16,000 R.P.M.
When setting up your router machine to join timber using the TAFJ 90 B ½ Router Bit, follow these steps to assist in accurate joining. Make all adjustments prior to machining with the power supply switched off.
- Accurately measure the thickness of the timber to be joined.
- Mark a point half the thickness of the timber along the edge to be joined. Note: Where possible use a marking gauge to ensure greater accuracy as this will enable you to produce a more accurate joint.
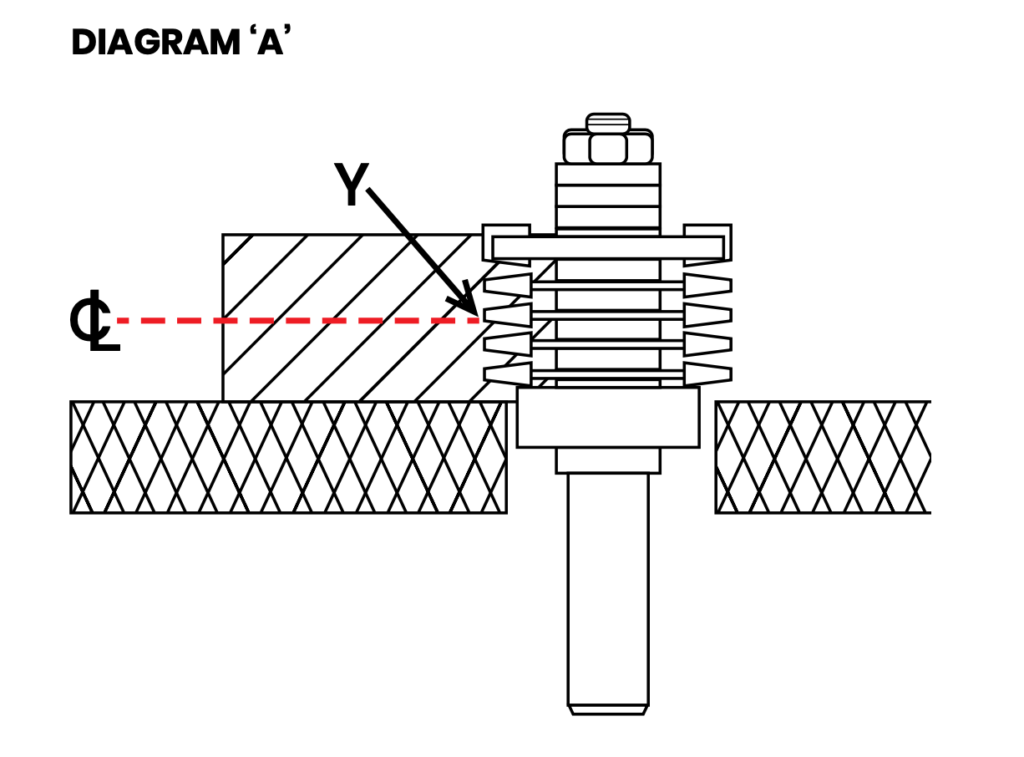
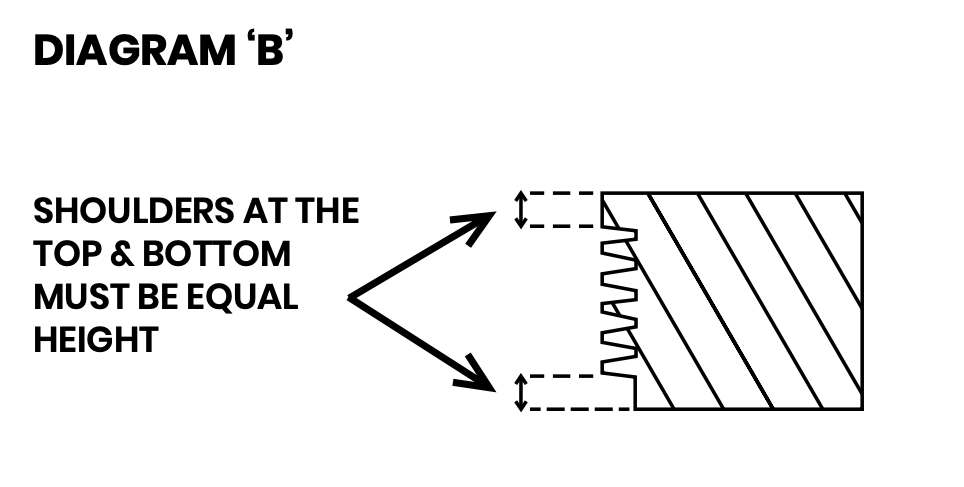
- Set the cutter height so that the bottom edge of the middle slotting cutter tooth lines up with the centreline of the timber. See point ‘Y’ in diagram ‘A’. Importantly, the shoulders, at the top & bottom of the joint, should be of equal height. See diagram ‘B’.
- Set the Router Fence so it is aligned with the bearing guide. Position a straight edge, steel ruler or similar, against the Router Fence so it’s bridging the gap between the two halves of the fence. Carefully adjust the fence position until the straight edge comes into contact with the bearing guide on the Finger Joint cutter then fasten the fence into position. Ensure that the cutters don’t come into contact with the fence when rotated.
- Run a test cut on two pieces of timber the same thickness as the material being joined. Invert one piece and ensure an accurate fit.
- Adjust the height of the router if necessary until the faces of both components are flush. If they’re misaligned by 1mm, adjust height by 0.5mm.
Step By Step Guide To Using The TAFJ 60 ½ Finger Joint Router Bits
Important: This router bit is not for use in handheld routers. We advise that this bit be used in bench mounted/router tables or overhead routers only. TAFJ 60 ½ should only be used in a routing machine with a variable speed adjustment. Due to the large diameter of this bit it should not be operated at a spindle speed of more than 12,000 R.P.M.
When setting up your router machine to join timber using the TAFJ 60 ½ Router Bit, follow these steps to assist in accurate joining. Make all adjustments prior to machining with the power supply switched off.
- Accurately measure the thickness of the timber to be joined.
- Mark a point half the thickness of the timber along the edges to be joined. Note: Where possible use a marking gauge to ensure greater accuracy as this will enable you to produce a more accurate joint.
- The point “Y” shown in diagram ‘A’ should be set in line with the mark made on your timber in step 2. ie The point ‘Y’ which is exactly half the height of the middle finger of the cutter, should be set in line with a point half the thickness of the timber to be joined.
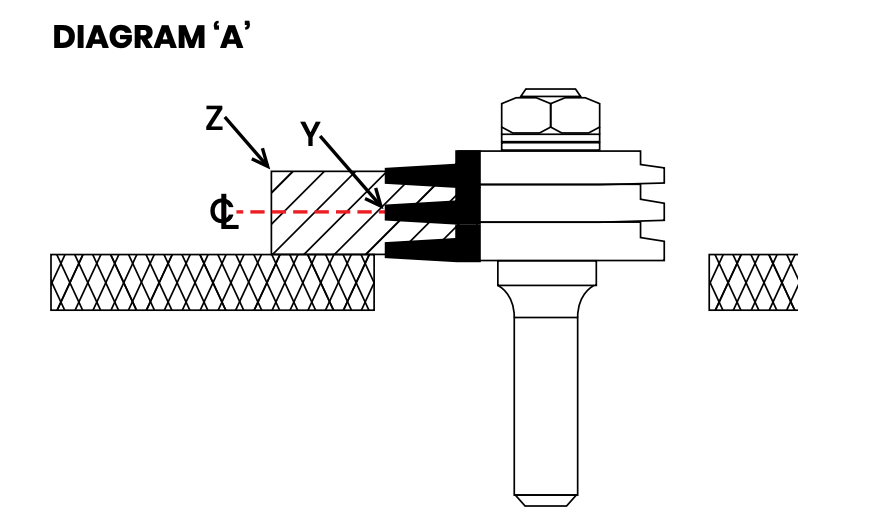
- The point ‘Z’, shown in diagram ‘A’, should be set in line with the router fence. If your router table has a two piece fence, the fences should be set up to form a straight line.
- Machine one edge of the piece(s) of timber to be joined to produce the male component of your joint. If your router machine is labouring, set the fence so as to take a smaller depth of cut per pass, then re-set fence as in step 4 to take the finish cut.
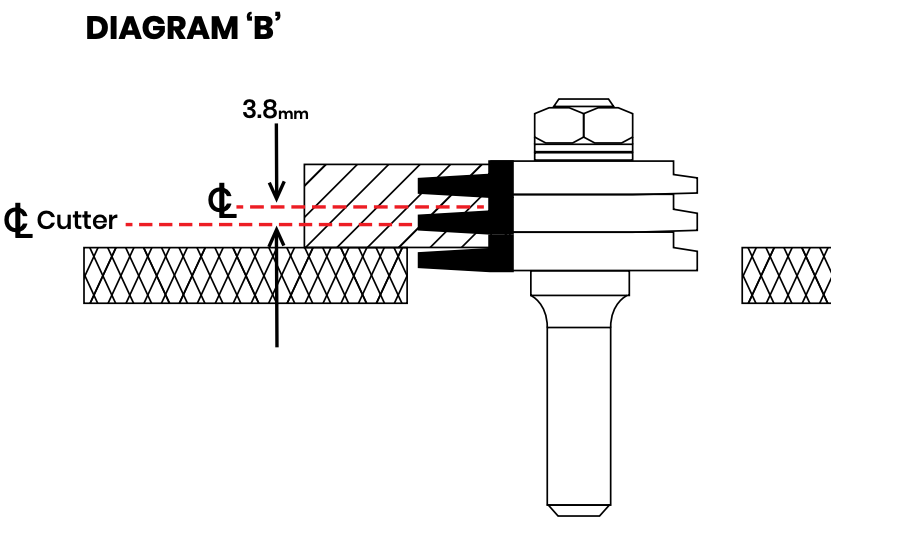
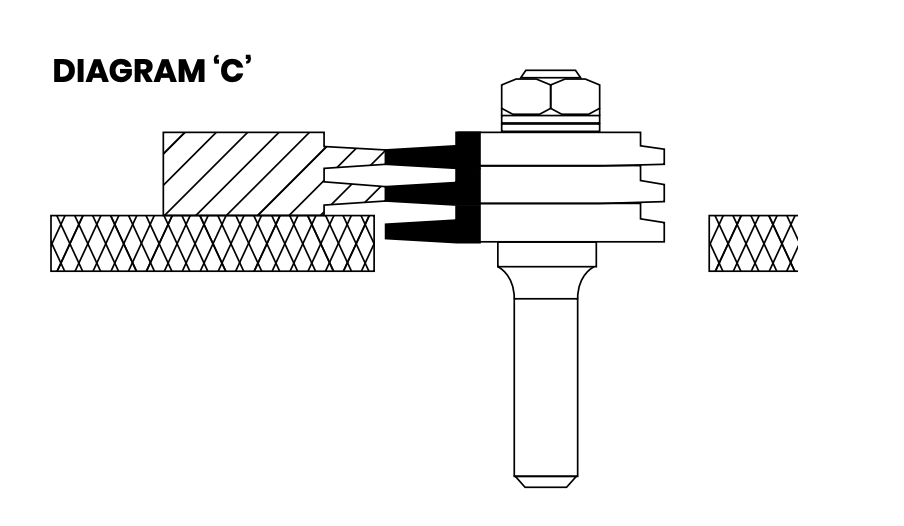
- Lower the cutter 3.8mm and machine the edge of the piece(s) of timber that will form the female component of your joint. See Diagram ‘B’. Where possible use a scrap piece of timber of the same thickness as those you wish to join in order to check your set up before machining for your finished job. Alternatively use the machined male component as a set up gauge. (See Diagram ‘C’.) Lower the cutter until the fingers of the cutter are level with fingers on the male component. With this method use a scrap piece of timber to check your set up.
- Adjust the height of the router if necessary until the face of both the male and female components are flush.
We hope this guide has helped you to create the perfect joint.
Original Source: https://www.carbitool.com.au/2021/11/how-to-use-tafj-90-b-%c2%bd-tafj-60-%c2%bd-finger-joint-router-bits/